

First off I’d like to say WOO HOO !! finally in the UK !
For hockey player it’s incredbily important to practice shooting and stickhandling as often as possible. The big problem in the UK for hockey players is finding a suitable surface and space to practice their stickhandling and shooting off the ice. Some of us result to practicing on roads, parks and in our gardens. The issue with pavement and other hard surfaces is the friction, it causes the puck to flip up all over the place (annoying as hell) and also prevents the puck from sliding like we want it to. Lets not forget that the pavement will also your stick blade to wear away quicker than it would on the ice (costing you money).
Shooting and Stickhandling Surfaces

Their are lots of cheap alternatives, but I find each cheap alternative will have a downfall in one way or another. I believe that if you are serious about improving your shooting and stickhandling it is important to find a good surface to practice on. Some of the products I have used and review are Hockey Shooting Pads (of different sizes) and also the Roll Up Shooting Pads. I really like these as a fixed size space to training on. But what if you want to start small and build an ultimate training area?
Slick Dryland Hockey Flooring Training Tiles
We were sent a few boxes of these tiles to review from Sweet Hockey. Here is some information about the training tiles from the Sweet Hockey Website
What are Slick Tiles?
- Slick Tiles provide a great surface to work on those stickhandling and shooting skills. These 12”X 12” Dryland tiles are lightweight & economical and are easy to assemble using a tongue and grove system. This construction leaves the surface seamless and without gaps to provide the feel of the ice with the puck.
- The Slick Tiles surface has very low abrasion factor which means very little wear and tear on your stick. Slick Tiles has great durability and with it’s UV protector can be used on the driveway or in the garage (no problem driving the team bus on these tiles).

Product Features:
- Each tile is 12″ by 12″. Thus making it EASY to do the calculations for an area.
- Sold 20 tiles per box.
- UV protected, especially for garages and outdoor areas.
- Durable enough to be driven on by vehicles.
- Available in 2 colors: BLUE or WHITE.
- Smooth surface for less friction from the puck.
- Measuring Guide:
- 1 Box = 20 pieces (covers 4′ x 5′ area).
- 2 Boxes = 40 pieces (covers 8′ x 5′ area).
- 3 Boxes = 60 pieces (covers 6′ x 10′ area).
- 4 Boxes = 80 pieces (covers 8′ x 10′ area).
- 5 Boxes = 100 pieces (covers 10′ x 10′ area).
Our flooring can be installed wall-to-wall to create the perfect stickhandling/ shooting zone in your basement or garage! (Can use a table saw, hack saw or circular saw; we suggest using a blade for cutting plastic). If you need to disassemble the flooring it is as easy as snapping it apart. The possible configurations are endless!
Quality of Material
The tiles are very durable, on the top they features a very smooth surface for stickhandling and shooting (slick like ice), and on the bottom they have an almost honeycomb structure making them very strong. The tiles are not to stiff and it do not seem like they would snap or shatter with a slapshot.
Setting up the Hockey Training Tiles
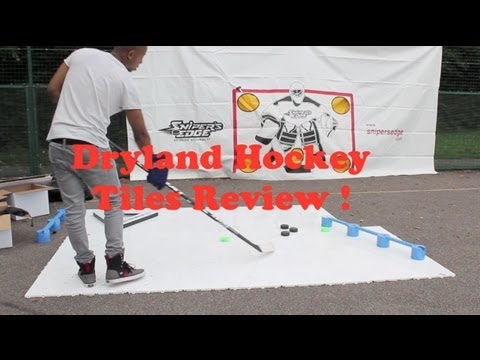
This was fun and very quick considering the size of the area I set up (alone) it takes a little playing with but anyone can get use to them very quickly. I wondered if there was a special or specific way to snap them together, but all you need to do is put the clip side over the ring side and then hammer or press them in together. Each box has 20 tiles, and the tiles measure 12 inches by 12 inches, I set up the first box as 5 tiles by 4 tiles and used 3 boxes in total and set them up as 7 tiles by 9 tiles.

(3 Boxes used)
I recommend 3 to 4 boxes as a big enough area for a nice flat garden, park or courts (basketball or tennis) you could have 2 people training on an area of this size.. 3 boxes gave me a lot of space to stickhandle and practice shooting. I also added a few more bits from hockeytrainingaid.com to give me a bit more to play with.

(3 boxes used)
On the right side is the Sweet Hands which is great for all hockey players, and on left side, in the corner, we have the Passmaster. The PassMaster will send the puck back to you if you pass into it. We also have the Green Biscuit. Click on the names of the products to see reviews on all of them.
Stickhandling and Shooting on the Training Tiles
Stickhandling
I worked on a variety of moves on the Dryland Tiles, first I just did some basic stickhandling with a regular hockey puck and the Green Biscuit, I moved onto practicing some passing then moved on to small dekes and and Toe Drags. The Dryland hockey tiles held up well while enduring all of my abuse, I was quick stepping and darting around while moving the puck quickly in all directions and taking a few quick shots. The Dryland hockey tiles did not come apart AT ALL and most importantly, the pucks did not get stuck, flip up or get caught on the edges of the tiles (where each tile attached to the other). I was very impressed at how smoothly the tiles fit together and how well the pucks glided over the top.
Can you drive on them !?
Sweet Hockey say that you can drive a car onto the tiles and they will not break, so we thought it would be fun to test this out. To my surprise I drove over the tiles several times and parked on top of them. The tiles did not bend crack or break at all ! amazingly durable and best of all, no need to move them from the drive way.


Shooting
3 boxes of tiles gave me more than enough room to take a wrist shots and slap shot. I took a tone of slap shots and did not feel the tiles move at all and there was no damage to the tiles either.
Compared to other products
I’ve always loved Roll Up Shooting Pads which are 1 meter by 2 meters in length, this shooting pad gives you the biggest surface for training in (as a shooting pad). A box of 20 training tiles costs £149.99 and gives you 1.2 meters by 1.6 meters, but the big advantage to the tiles is that you can buy more down the line and increase the area to whatever size you want (my house will be covered in these !).


Overall Thoughts
I think that these tiles definitely live up to expectations and are by far the best option for off ice training surfaces as you can simply keep on building.
- They were nice and durable
- They fit together perfectly with no raised edges or ends
- The pucks (normal and Green Biscuit) slide perfectly over the top (used pucks work better than new pucks)
- Easy to set up and pack away if required
- Buy one box and slowly build your home hockey centre
- Park a car on them !
I would recommend these to anyone who has a flat garden, park near by or driveway or flat open area and wants to start a cool place to practice stickhandling and shooting.
Get your Dryland Training Tiles Here ! Shop Hockeytutorial

